내돈내고 내가 공부한것을 올리며, 중요한 단원은 저 자신도 곱씹어 볼겸 상세히 기록하고 얕은부분들은 가겹게 포스팅 하겠습니다.

1) 섹션15
이번시간에는 스마트 포인터에 대하여 배웠다.

15-1 이동의 의미와 스마트 포인터
C++에서 동적메모리를 직접 관리하는것은 불편하다. 이러한 부분을 개선한 smart pointer가 무엇인지? 어떤 역할을 하는지에 대하여 배우게 되었다.
Resource.h
#pragma once

#include <iostream>

class Resource {
public:
	int m_data[100];
public:
	Resource() {
		std::cout << "Resource constructed" << std::endl;
	}

	~Resource() {
		std::cout << "Resource destroyed" << std::endl;
	}
};
main.cpp
다음 코드와 같이 doSomething 함수 내부에서 메모리를 동적으로 할당받고, 함수가 끝나기전 메모리를 다시 반환하는 방식
즉, 생성한 존제가 끝까지 책임을 지는방식을 RAII(resource acquisition is initalization) 라고 부른다.
#include <iostream>
#include "Resource.h"

using namespace std;

// RAII : resource acquisition is initalization
void doSomething()
{
	Resource* res = new Resource;

	// work with res
	if (true) return; // early return

	delete res;

	return;
}

int main()
{
	doSomething();

	return 0;
}
위의 코드에서 doSomething함수 내부를 보면 if문에 의해서 early return을 해주고 있다.
따라서 뒤에있던 delete res;가 실행되지 않고, 이로인하여 메모리 누수(memory leak)가 발생하게 된다.
다음과 같이 변경하면 일단 해결은 가능하다.
void doSomething()
{
	Resource* res = new Resource;

	// work with res
	if (true) {
		delete res;
		return;
	}

	delete res;

	return;
}
하지만 이러한 방식 또한 번거롭기는 마찬가지다. 전통적인 C++강의에서는 위의 코드처럼 꼭 delete를 하고 나가는 방식으로 가르쳐왔다. 최근의 modern c++에서는 smart pointer의 사용을 추천한다.
이렇게 되면 delete을 해줘야 한다는 수고를 덜을 수 있다.
우선 smart pointer를 보기전에 자동으로 메모리를 반환해주는 class를 한번 직접 구현해 보면서 작동 방식을 이해해보자.
AutoPtr.h
#pragma once

#include <iostream>
// std::auto_ptr C++17이후 사라짐

template<class T>
class AutoPtr {
public:
	T* m_ptr = nullptr;
public:
	AutoPtr(T *ptr = nullptr) : m_ptr(ptr) {}
	~AutoPtr() {
		if (m_ptr != nullptr) delete m_ptr;
	}
	// 오버로딩
	T& operator*() const { return *m_ptr; }
	T* operator->() const { return m_ptr; }
	bool isNull() const { return m_ptr == nullptr; }
};
위의 코드를 보면 소멸자에서 m_ptr이 nullptr이 아닌경우, 자동으로 delete해주고 있다.
바뀐 main.cpp
#include <iostream>
#include "Resource.h"
#include "AutoPtr.h"

using namespace std;

// RAII : resource acquisition is initalization
void doSomething()
{
	//Resource* res = new Resource; // dull poiter
	AutoPtr<Resource> res(new Resource); // smart pointer class 초기화

	// work with res
	if (true) { return;}

	//delete res;

	return;
}

int main()
{
	doSomething();

	return 0;
}
위의 doSomething 내부 에서는 메모리를 할당받은후 반환해주는 코드가 없다.
early return을 하던, 정상종료를 하던 상관없이 메모리를 반환하는 부분은 보이지 않고있다. 그렇다면 결과는 어떻게 나올까?

AutoPtr_class를 구현해놨기 때문에 정상적으로 delete가 되고 소멸자가 완료되는것을 볼 수 있다.
이와같은 방식으로 smart pointer는 작동한다.
하지만 꼭 장점만 있는것이 아니다. 다음과같은 경우를 살펴보자.
int main()
{
	AutoPtr<Resource> res1(new Resource); // 메모리를 받는경우
	AutoPtr<Resource> res2; // 메모리는 받지않음, nullptr

	cout << std::boolalpha;

	cout << res1.m_ptr << endl; // 유효한 주소
	cout << res2.m_ptr << endl; // nullptr이니까 0

	res2 = res1; // 문제의 지점

	cout << res1.m_ptr << endl;
	cout << res2.m_ptr << endl;

	return 0;
}
위의 코드는 res1은 메모리를 할당받지만, res2는 nullptr을 받고있다.
문제는 res2 = res1; 에서 대입이 되면서 주소값이 복사된다는점이다.
이상태로 실행을 하면 예전에 배운 얕은복사와 같은 이유로 에러가 발생할 것 이다. 실행시 Runtime_error이 발생한다.

대입 연산 이후 둘다 같은 메모리를 가리키고 있다. 문제는 첫번째 메모리를 반환한 후, res2가 자기도 반환하려고 시도하기때문에 runtime error가 발생한다.
이를 어떻게 해결해야 할까?
가장 깔끔한 방법은 메모리에 대한 소유권을 항상 하나만 갖도록 설계하는 것 이다.
따라서 res2 = res1 의 경우 res2에 복사되면서 소유권을 넘겨받고, res1은 소유권을 박탈당하도록 구성해야한다.
바뀐 AutoPtr.h
#pragma once

#include <iostream>
// std::auto_ptr C++17이후 사라짐

template<class T>
class AutoPtr {
public:
	T* m_ptr = nullptr;
public:
	AutoPtr(T *ptr = nullptr) : m_ptr(ptr) {}
	~AutoPtr() {
		if (m_ptr != nullptr) delete m_ptr;
	}

	AutoPtr(AutoPtr& a) // copy constructor
	{
		m_ptr = a.m_ptr; // 첫번째 포인터를 복사하여 대입
		a.m_ptr = nullptr; // 첫번째 포인터를 nullptr로 변경
	}

	AutoPtr& operator = (AutoPtr& a)
	{
		if (&a == this) // 자기 자신일 경우
			return this;

		delete m_ptr; // 이미 메모리 주소를 갖고있다면 지움
		m_ptr = a.m_ptr; // 새로운 주소를 받음
		a.m_ptr = nullptr; // 원래꺼는 nullptr로 변경
		return *this;
	}

	// 오버로딩
	T& operator*() const { return *m_ptr; }
	T* operator->() const { return m_ptr; }
	bool isNull() const { return m_ptr == nullptr; }
};
바뀐 main.cpp 에서의 실행
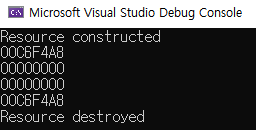
처음에는 소유권을 res1이 갖고있다가 = 연산자를 main에서 진행한 후에는 res1이 null이되고, res2가 메모리 주소를 갖고있다.
res2가 나오면서 소멸자를 실행한다. 이렇게 소유권을 이전하는 것을 move semantics 라고 부른다.
C++ 에서 알아야 할 semactics는 3종류가 있다.
1) value semantics (copy semantics)
2) reference semantics (pointer)
3) move semantics (move)
따라서 우리가 위에서구현한 = 연산자는 copy semantics(값을 복사해서 넘기기만 하는)를 구현한 것 이 아니라,
move semantics(값을 복사하여 넘긴후 소유권 까지 넘긴)를 구현한 것 이다.
마지막으로 auto pointer는 다음과 같은 오류가 있을수 있다.
int main()
{
	AutoPtr<Resource> res1(new Resource); // 메모리를 받는경우
	AutoPtr<Resource> res2; // 메모리는 받지않음, nullptr

	doSomething(res1);

    res2 = res1;

	return 0;
}
위의 코드를 보면 doSomething이라는 함수가 인자로 res1을 받아들이면서 내부적으로 복사가 되고, doSomething이 종료될때 내부에서 메모리가 소멸이 일어난다.
이후 다시 외부에서 res1을 사용하려 들면 문제가 생긴다.
이런 문제는 어떻게 해결해야할지 등등.. 이러한 문제들이 smart pointer를 다룰때 생각해야할 점 이다.
15-2 R-value reference
이번시간에는 move semantics를 사용할지 말지를 판별하는 R-value reference를 공부해보자.
우선 L-value reference의 복습부터 해보자. 주석된 코드는 에러가 나타나는 코드들 이다.
	int x = 5;
	int y = getResult();
	const int cx = 6;
	const int cy = getResult();

	// L-value reference
	int &lr1 = x;		// Modifiable l-values
	//int &lr2 = cx;	// Non-modifiable l-values
	//int &lr3 = 5;		// R-values

	const int& lr4 = x;	// Modifiable l-values
	const int& lr5 = cx;// Non-modifiable l-values
	const int& lr6 = 5;	// R-values
R-value reference에 대하여 알아보자. 참고로R-value reference는 &를 2개 사용하는 &&형태로 표현한다.
	// R-values references

	//int &&rr1 = x;	// Modifiable l-values
	//int &&rr2 = cx;	// Non-modifiable l-values
	int&& rr3 = 5;		// R-values

	//const int &&rr4 = x;	// Modifiable l-values
	//const int &&rr5 = cx; // Non-modifiable l-values
	const int&& rr6 = 5;	// R-values
위의 코드에서는 int&& rr3 = 5; 가 중요하다. rr3 = 5에서 5는 임시의 값이다.
메모리가없기때문에 곧 사라질 운명이다. 임시로만 존제하는놈을 어딘가에 보관해주는 것이 R_value reference이다.
곧 사라질애들만 담을 수 있으며, R-valur reference로 가리켜 지는애들은 move semantics를 통해 이동시켜도 어차피 사라질 운명이였으니 아무도 찾지않는다.

원래는 금방 사라질 운명이였던 R-value인 5가 사라지지 않고 수명이 연장되고있다.
심지어 값이 변경까지 되고있다. 숫자 5는 rr3외에는 아무도 접근할수가 없으며, rr3만이 사용하거나 값을 바꿀수있음을 의미한다.
더 나가아 숫자 5가 아니라 어떤 class의 객체라면, 그 객체가 갖고있는 데이터를 rr3로 완전히 이전을 해버려도 문제가없으며, 또 사용을 할수있게 하겠다는 의미이다.
#include <iostream>

using namespace std;

void doSomething(int& lref)
{
	cout << "L-value ref" << endl;
}

void doSomething(int&& ref)
{
	cout << "R-value ref" << endl;
}

int getResult()
{
	return 10 * 10;
}

int main()
{
	int x = 5;
	int y = getResult();
	const int cx = 6;
	const int cy = getResult();

	// L/R-value reference parameters
	doSomething(x); // l-value reference를 매게변수로 갖는
	//doSomething(cx);
	doSomething(5);
	doSomething(getResult());

	return 0;
}
위의 코드에서는 doSomething함수가 받는 매게변수에 따라서 2개의 함수가 구현되어있으며, 컴파일러가 이를 오버로딩 해준다.
parameter가 L-value reference인것과 R-value reference인것은 서로 다르게 작동할수 있도록 오버로딩으로 인정을 해준다.
결과값은 다음과 같다.

doSomething(int&& ref)를 생각해보자. 인자로 R-value가 들어온다는 것 이며, 이 R-value는 어짜피 금방 사리질 운명이였기 때문에 doSomething에서 R-value reference로 받아온 경우에는 함수 안에서 reference에 담겨있는 데이터 들을 move semantics해서 소유권을 갖어와도 된다는 것 이다.
어짜피 다른데서 쓸일이 없기때문에 move semantics 를 사용할수가 있는 것 이다.
반대로
L-value reference를 사용하는경우 함수의 인자로 들어오는 것이 메모리 주소를 갖고있는 변수이고, 그 변수는 doSomething함수 밖에서도 접근이 가능해야한다. 그니까 move semantics로 소유권을 갖어와 버리면, 밖에서 다시 변수에 접근하여 사용하려할때 문제가 생긴다.
15-3 Move constructors와 Move assignment
소스코드 중 Timer.h가 강의에서 확인할수가 없어서 글을 작성할 수 가 없었다.
이번 쳅터는 간단히 말로만 설명하고 지나가면 모든 자원을 통체로 복사해서 넘기는 deep copy는 시간이 많이 걸리지만,
단순히 포인터안에 담긴 주소값만 넘기는, 즉 소유권만 넘겨주는 move semantics형식의 얕은 복사는 시간이 적게 걸린다.
이러한 포인터만 넘겨주는 형태의 복사를 move sematics라 생각하면 된다. 소유권만 간단히 넘기는 것 이다.
15-4 std::move
프로그래머 스스로 move sematics를 사용할지 말지를 결정하고싶을때가 있다. 이럴때 사용하는 std::move에 대하여 알아보았다.
우선 코드를 확인해보자.
AutoPtr.h
#pragma once

#include <iostream>
// std::auto_ptr C++17이후 사라짐

template<class T>
class AutoPtr {
public:
	T* m_ptr = nullptr;
public:
	AutoPtr(T *ptr = nullptr) : m_ptr(ptr) {}
	~AutoPtr() {
		std::cout << "AutoPtr destructor " << std::endl;
		if (m_ptr != nullptr) delete m_ptr;
	}

	AutoPtr(const AutoPtr& a) // l-value reference
	{
		std::cout << "AutoPtr copy constructor " << std::endl;

		// deep copy
		m_ptr = new T;
		*m_ptr = *a.m_ptr;
	}

	AutoPtr& operator = (const AutoPtr& a)
	{
		std::cout << "AutoPtr copy assignment " << std::endl;

		if (&a == this) // 자기 자신일 경우
			return *this;

		if (m_ptr != nullptr) delete m_ptr;

		// deep copy
		m_ptr = new T;
		*m_ptr = *a.m_ptr;

		return *this;
	}

	AutoPtr(AutoPtr&& a) : m_ptr(a.m_ptr) {
		a.m_ptr = nullptr;

		std::cout << "AutoPtr move constructor " << std::endl;
	}

	AutoPtr& operator=(AutoPtr&& a)
	{
		std::cout << "AutoPtr move assignment " << std::endl;

		if (&a == this)
			return *this;

		if (!m_ptr) delete m_ptr;

		m_ptr = a.m_ptr;
		a.m_ptr = nullptr;

		return *this;
	}

	// 오버로딩
	T& operator*() const { return *m_ptr; }
	T* operator->() const { return m_ptr; }
	bool isNull() const { return m_ptr == nullptr; }
};
Resource.h
#pragma once

#include <iostream>

class Resource {
public:
	int *m_data = nullptr;
	unsigned m_length = 0;
public:
	Resource() {
		std::cout << "Resource default constructed" << std::endl;
	}

	Resource(unsigned length)
	{
		std::cout << "Resource length constructed" << std::endl;

		this->m_data = new int[length];
		this->m_length = length;
	}

	Resource(const Resource& res)
	{
		std::cout << "Resource copy constructed" << std::endl;

		Resource(res.m_length);
		for (unsigned i = 0; i < m_length; i++)
			m_data[i] = res.m_data[i];
	}

	~Resource() {
		std::cout << "Resource destroyed" << std::endl;

		if (m_data != nullptr) delete[] m_data;
	}

	Resource& operator = (Resource& res)
	{
		std::cout << "Resource copy assignment" << std::endl;

		if (&res == this) return *this;
		if (this->m_data != nullptr) delete[] m_data;
		m_length = res.m_length;
		m_data = new int[m_length];

		for (unsigned i = 0; i < m_length; i++)
			m_data[i] = res.m_data[i];

		return *this;
	}

	void print()
	{
		for (unsigned i = 0; i < m_length; i++)
			std::cout << m_data[i] << " ";
		std::cout << std::endl;
	}
};
main.cpp
#include <iostream>
#include "AutoPtr.h"
#include "Resource.h"

using namespace std;

int main()
{
	AutoPtr<Resource> res1(new Resource(10000000));

	cout << res1.m_ptr << endl;

	AutoPtr<Resource> res2 = res1;

	cout << res1.m_ptr << endl;
	cout << res2.m_ptr << endl;

	return 0;
}
위의 코드를 실행시키면 main의 res2 = res1에서는 copy semantics가 될까?
아니면 move semantics가 될까? 결과를 확인해 보자.
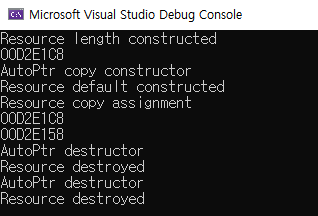
3번째 줄을보면 copy constructor가 출력되고있다. 이는 move가 아닌 copy가 되고있다는 것 이다.
이럴때 move를 하고싶으면 어떻게 해야할까? 다음과 같이 직접 변경해주면 된다.
AutoPtr<Resource> res2 = std::move(res1);move는 복잡한 기능을 하는것이 아니라 내부적으로 들어온 인자를 R-value로 return해 준다.
즉 = 연산자를 통하여 대입할때 R-value라고 인식시키는 것 이다. 결과를 출력해보자.
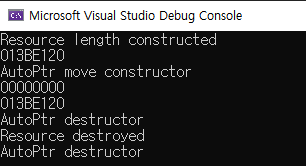
move constructor가 실행되고 있다. 또한 주소지 가 res1이 00000000으로 바뀐것이 보이는데, nullptr이 된 것 이다.
res1을 move한후에 어떠한 작업을 외부에서 한다면, 이는 프로그래머의 책임이다.
따라서 R-value만을 move semantics하는것은 다 이유가 있다.
이번에는 예제를 바꿔서 알아보자.
main.cpp는 다음과 같이 변경되었다.
template<class T>
void MySwap(T& a, T& b)
{
	T tmp = a;
	a = b;
	b = tmp;
}

int main()
{
	{
		AutoPtr<Resource> res1(new Resource(3));
		res1->setAll(3);

		AutoPtr<Resource> res2(new Resource(5));
		res2->setAll(5);

		res1->print();
		res2->print();

		MySwap(res1, res2);

		res1->print();
		res2->print();
	}

	return 0;
}
또한 Resource.h에 setAll이라는 멤버함수 하나가 추가되었다.
	void setAll(const int& v)
	{
		for (unsigned i = 0; i < m_length; i++)
			m_data[i] = v;
	}
실행시켜보면 다음과 같다.

MySwap함수에서 뭐가 엄청많이 복사되고 있다. 또한 값이 333 55555 에서 55555 333으로 바뀐것을 알수있다.
이과정에서 복사가 많이 진행된것이다.
따라서 MySwap함수 안에서 move semantics를 이용하여 swap을 해보도록 코드를 변경해보자.
template<class T>
void MySwap(T& a, T& b)
{
	//T tmp = a;
	//a = b;
	//b = tmp;
	T tmp(std::move(a)); // move semantics
	a = std::move(b);
	b = std::move(tmp);
}
결과는 다음과 같다.
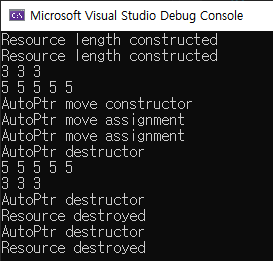
결과가 깔끔해졌다. copy constructor와 copy assignment는 실행되고있지 않다.
deep copy가 진행되고 있지 않기때문에 효율면에서도 매우 증가하였다.
이번에는 vector를 통한 예를 살펴보자.
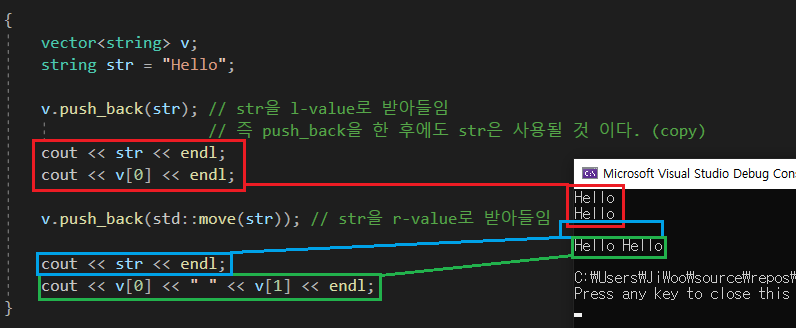
Hello가 2번 출력된 이후 한칸 점프한 이유는 move semantics되었기 때문에 str안이 텅빈것 이다.
이는 내부적으로 R-value reference에 대하여 push_back이 별도로 구현이되있기 때문에 작동하는 것 이다.
15-5 std::unique_ptr
포인터가 가리키고있는 데이터의 소유권이 한곳에만 속할경우 사용하는 smart pointer, unique_ptr에 대하여 알아보자.
우선 다음코드는 이전의 코드들을 재활용 한 예제이다.
#include <iostream>
#include "AutoPtr.h"
#include "Resource.h"

using namespace std;

int main()
{
	{
		Resource* res = new Resource(10000000);
	}

	return 0;
}
위의 예제는 메모리 반환을 해주지 않고있다. 따라서 메모리누수가 일어난다. 이를 smart_pointer를 사용하여 해결해 보자.
이를 위해서는 <memory>를 include 해줘야 한다.
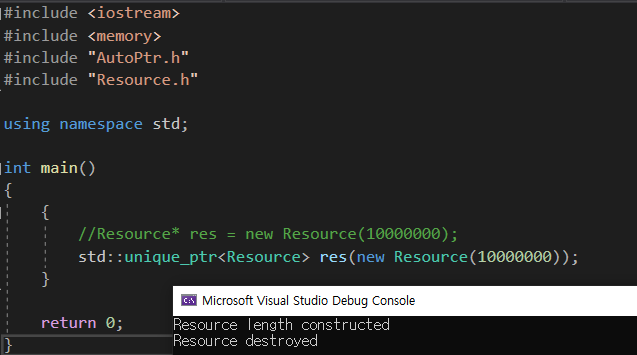
위의 코드는 스마트포인터를 사용하고있다. 어디에도 delete해주는 부분이 없지만, 중괄호를 벗어나면서 자동으로 소멸자를 실행하고 있다. 이것이 기본적인 unique_ptr의 역할이다.
main.cpp
#include <iostream>
#include <memory>
#include "AutoPtr.h"
#include "Resource.h"

auto doSomething() {
	return std::unique_ptr<Resource>(new Resource(5));

	// return std::make_unique<Resource>(5); 내부적으로 move semantics를 사용
}

int main()
{
	{
		std::unique_ptr<int> upi(new int); // 기본 자료형에도 사용가능

		//std::unique_ptr<Resource> res1(new Resource(5)); // 사용가능
		auto res1 = std::make_unique<Resource>(5); // 권장하는 방식
		//auto res1 = doSomething(); // 사용가능

		res1->setAll(5);
		res1->print();

		std::unique_ptr<Resource> res2;

		std::cout << std::boolalpha;
		std::cout << static_cast<bool>(res1) << std::endl;
		std::cout << static_cast<bool>(res2) << std::endl; // nullptr

		// res2 = res1; // unique pointer는 복사를 못한다. 소유권이 한곳만
		res2 = std::move(res1); // move semantics는 사용가능

		std::cout << std::boolalpha;
		std::cout << static_cast<bool>(res1) << std::endl;
		std::cout << static_cast<bool>(res2) << std::endl; // nullptr

		if (res1 != nullptr) res1->print(); // member selection 연산자 사용가능
		if (res2 != nullptr) res2->print();
	}

	return 0;
}
위의 코드를 확인해보면 unique_ptr도 좋지만, make_unique의 사용을 권장해 주셨다.
또한 unique 포인터는 copy를 할수가 없다. 이름 그대로 소유권이 unique해야한다. 따라서 move semactics만 사용 가능하다.
실행결과는 다음과 같다.
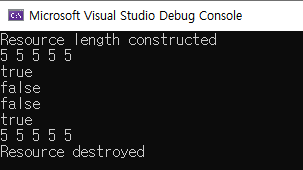
위의 결과로 res1은 true, res2는 false가 출력되고있다. 이후 move semactics를 통해 소유권을 넘겨주고 있으니 false, true로 변경되었다. 마지막으로 res2가 55555를 출력후, 한번만 소멸자를 실행하고 끝난다.
다른 예제를 확인해 보자.
#include <iostream>
#include <memory>
#include "AutoPtr.h"
#include "Resource.h"

void doSomething2(std::unique_ptr<Resource>& res)
{
	res->setAll(10);
}

int main()
{
	{
		auto res1 = std::make_unique<Resource>(5);
		res1->setAll(1);
		res1->print();

		doSomething2(res1);

		res1->print();
	}

	return 0;
}
위의 코드에서 주목할 점은 doSomething2 함수에서 인자를 l-value reference로 받고있다는 점 이다. 결과는 다음과 같다.

만약 doSomething2가 매게변수를 참조형이 아닌 변수형으로 받으면,
void doSomething2(std::unique_ptr<Resource> res)
main에서 doSomething2(res1)에서 에러가 발생한다. 왜냐하면 res1은 unique_ptr인데 이를 l-value로 받을려 하니 에러가 발생한다.
복사되기를 거부하는 것 이다.
이를 억지로 std::move(res1)으로 인자를 넘겨주면 문제인 것 이 소유권 자체가 넘어가서 doSomething2(res1) 이후의 res1->print()에서 문제가 생긴다. res1은 nullptr이 되었기 때문이다. 또한 doSomething2 내부로 res1의 소유권이 이전되어버려서 doSomething2()가 끝나는 시점에서 메모리가 소멸된다.
이를 해결하기 위해 코드를 다음과 같이 변경해 보자.
auto doSomething2(std::unique_ptr<Resource> res)
{
	res->setAll(10);
	return res;
}

int main()
{
	{
		auto res1 = std::make_unique<Resource>(5);
		res1->setAll(1);
		res1->print();

		res1 = doSomething2(std::move(res1));
		// 다시 소유권을 넘겨받음
		res1->print();
	}

	return 0;
}
위의 코드는 doSomething2가 끝나면서 return을 해서 소유권을 다시 res1으로 전달하였다. 정상적으로 작동하고 있다.
다음으로는 포인터를 사용하는 예를 보자.

unique 포인터에는 내부적으로 get()이라는 함수가있으며, 반환형을 보면 Resource* 형 이다.
Resource의 포인터를 갖어오는 함수이다.
이를 통해 Resource의 포인터를 알아내어 인자로 넘겨주면 마치 l-value reference로 보낸것 처럼 정상 작동한다.
마지막으로 초보자가 하는 실수를 살펴보자.
int main()
{
	{
		Resource* res = new Resource;
		std::unique_ptr<Resource> res1(res);
		std::unique_ptr<Resource> res2(res);

		delete res;
	}

	return 0;
}
unique 포인터를사용하는데 res의 소유권을 res1과 res2 두곳에 전달하고있다.
이는 잘못된 사용이다. 또한 습관적으로 delete를 추가해줘도 안된다. smart_pointer를 사용중이다.
delete는 자동으로 알아서 해준다. 우리가 하면 2번이나 하게된다.
15-6 std::shared_ptr
이전시간에 배운 unique_ptr과 달리 소유권을 여러군데에서 공유할수 있는 shared_ptr에 대하여 배우게 되었다.
shared_ptr은 내부적으로 자기가 가리키고있는 주소의 포인터가 몇군데에서 공유하고있는지를 counting 한다.
main.cpp
#include <iostream>
#include "Resource.h"

int main()
{
	Resource* res = new Resource(3);
	res->setAll(1);

	{
		std::shared_ptr<Resource> ptr1(res);

		ptr1->print();

		{
			std::shared_ptr<Resource> ptr2(ptr1);

			ptr2->setAll(3);
			ptr2->print();

			std::cout << "Going out of the inner_block" << std::endl;
		} // ptr2는 사라지지만, 여전히 ptr1이 res의 소유권을 갖고있음

		ptr1->print();

		std::cout << "Going out of the outer_block" << std::endl;
	} // ptr1이 사라지면서 delete

	return 0;
}
실행결과는 다음과 같다.
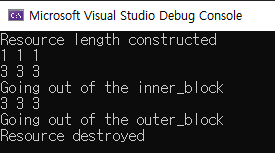
위의 코드를 보면 처음에 new로 메모리를 새롭게 동적할당받는 부분이 있다. 또한 main함수 내부에는 delete해주는 부분은 없다.
하지만 결과를 확인해 보면 Goint out of the outer_block 출력 다음에 Resource destroyed가 출력되고있는 것 을 확인할수있다.
어떻게 된 것일까?
이는 첫 중괄호에 들어오면서 std::shared_ptr<Resource> 에서 ptr1이 res와 공유하게 되는데 이 중괄호가 끝나면서 ptr1이 사리지게 되었고, 이때 res도 같이 사라지게 되어 메모리 해제가 일어난다.
문제가 생기는 경우는 다음과 같다.
int main()
{
	Resource* res = new Resource(3);
	res->setAll(1);

	{
		std::shared_ptr<Resource> ptr1(res);

		ptr1->print();

		{
			std::shared_ptr<Resource> ptr2(res); // res로부터 직접 만들어짐

			ptr2->setAll(3);
			ptr2->print();

			std::cout << "Going out of the inner_block" << std::endl;
		}

		ptr1->print();

		std::cout << "Going out of the outer_block" << std::endl;
	}

	return 0;
}
두번째 중괄호 안에보면 ptr2가 res를 직접 공유하게 된다. 또한 ptr1입장에서는 res의 소유권이 자기 말고 다른데 있다는것을 알수가 없다. 이럴때 문제가 생긴다. 실행시켜보면 결과는 다음과 같다.
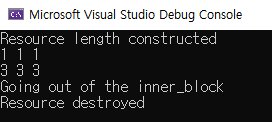
inner_block을 나가면서 메모리를 지워버리고 있다. 이로인하여 ptr1->print(); 는 실행되지도 못했다.
이런 방식보다는 다음코드와 같은 방식을 추천해 주셨다.
#include <iostream>
#include "Resource.h"

int main()
{
	{
		auto ptr1 = std::make_shared<Resource>(3); // 직접 초기화
		ptr1->setAll(1);

		ptr1->print();

		{
			auto ptr2 = ptr1;

			ptr2->setAll(3);
			ptr2->print();

			std::cout << "Going out of the inner_block" << std::endl;
		}

		ptr1->print();

		std::cout << "Going out of the outer_block" << std::endl;
	}

	return 0;
}
다른곳에서 메모리를 할당받고 그 포인터를 사용하여 shared_ptr을 초기화 하는 간접적인 방식보다는, 위의 코드에서처럼 ptr1을 직접 초기화 해주는 방식을 추천한다. 실행결과는 다음과 같다.

정상적으로 outer에서 나오면서 메모리가 반환된다. 정리해보면 shared_ptr은 소유권을 여러게 갖을 수 있는데, 소유권을 단지 copt해서 넣어주는 것 "처럼" 보이지만 내부적으로는 Resource에 대한 소유권을 몇군데에서 갖고있는지 다 기록을하고있기 때문에 마지막 shared_ptr이 소멸이 될때 Resource를 지운다. 그전에는 지우지 않는다. 편하게 사용하다 어딘가에서는 메모리가 지워지면서 끝날것이라고 생각하면서 사용할 수 있다.
15-7 std::weak_ptr
shared_ptr을 사용할때 발생하는 순환 의존성 문제를 살펴보고 이를 weak_ptr로 어떻게 해결하는지 살펴보자.
#include <iostream>
#include <memory>
#include "Resource.h"

class Person {
	std::string m_name;
	std::shared_ptr<Person> m_partner;
public:
	Person(const std::string& name) : m_name(name) {
		std::cout << m_name << " created\n";
	}
	~Person() {
		std::cout << m_name << " destroyed\n";
	}
	friend bool partnerUp(std::shared_ptr<Person>& p1, std::shared_ptr<Person>& p2)
	{
		if (!p1 || !p2)
			return false;

		p1->m_partner = p2;
		p2->m_partner = p1;

		std::cout << p1->m_name << " is partnered with " << p2->m_name << "\n";

		return true;
	}

	const std::string& getName() const {
		return m_name;
	}
};

int main()
{
	auto lucy = std::make_shared<Person>("Lucy");
	auto ricky = std::make_shared<Person>("Ricky");

	return 0;
}
위의 결과를 실행시키면 Lucy생성 -> Ricky생성 -> Ricky소멸 -> Lucy소멸 로 정상작동한다. 스마트포인터가 잘 작동하고있다.
main에 partnerUp 함수를 추가해주면 문제가 발생한다.
int main()
{
	auto lucy = std::make_shared<Person>("Lucy");
	auto ricky = std::make_shared<Person>("Ricky");

	partnerUp(lucy, ricky);

	return 0;
}
위의 결과를 실행시키면 다음과 같다.

소멸자가 실행되지 않고있고, 메모리가 지워지지 않아 누수가 발생하고있다. 왜 이런 현사이 나타날까?
우선 std::make_shared<Person>; 로 되어있다. Person을 지우려고 할때 멤버변수인 m_partner를 같이 지우려고 할 것 이다.
그런데 문제는 count가 된는 것 이다. parter는 살아있기 때문에 지울수가 없다. 따라서 자기자신도 지울수 없는 꼬인 상태가 된다.
이럴때 weak포인터 를사용하면된다.

사용법은 간단하다. shared_ptr를 weak_ptr로 바꿔주면 된다. 이러면 소멸자가 실행되고 정상작동 한다. 여기서 한가지 의문이 든다.
그럼 애당초 그냥 싹다 weak포인터를 사용하면 되는 것 아닌가?
weak포인터는 단점이있다. weak포인터의 내용물을 사용하려 할때 lock을 해줘야 한다. 다음 코드를 Person class에 추가해줘야 한다.
	const std::shared_ptr<Person> getPartner() const {
		return m_partner.lock();
	}
이렇게 lock() 을 해줘야 한다. lock의 return값을 보면 std::shared_ptr<Person> 으로 나타난다. lock함수를 호출하면 shared_ptr를 return 해주는 것 이다. 한마디로 shared_ptr로 바꿔서 사용하는 것 이다. weak포인터는 직접 사용할수가 없고, lock함수를 사용해서 shared_ptr을 통해서 사용할 수 있다.
'CS > C++' 카테고리의 다른 글
| C++ 공부 섹션17 String : 홍정모의 따배씨쁠쁠 (0) | 2022.01.17 |
|---|---|
| C++ 공부 섹션16 STL : 홍정모의 따배씨쁠쁠 (0) | 2022.01.17 |
| C++ 공부 섹션14 예외처리 : 홍정모의 따배씨쁠쁠 (0) | 2022.01.17 |
| C++ 공부 섹션13 템플릿 : 홍정모의 따배씨쁠쁠 (0) | 2022.01.17 |
| C++ 공부 섹션12 다형성 : 홍정모의 따배씨쁠쁠 (0) | 2022.01.16 |

댓글