1. 문제의 상황
현 술술 애플리케이션에서는 로그인 한 사용자가 Controller에 접근할 때 CustomUser 객체를 인자로 전달받는다.
문제는 CustomUser가 도메인의 순수한 핵심 Entity라는 점이다...
또한 SonarQube에서도 다음과 같이 취약지점으로 알려주고 있다.

과연 CustomUser의 모든 정보가 필요한 것일까?
아니다, 사실상 코드를 따라가며 읽어보니, id, email 2개의 값만 필요함을 알게 되었다.
따라서 이를 id, email만을 포함하는 DTO로 전달받도록 개선해 보자!
참고로, @CurrentUser는 내부에 @AuthenticationPrincipal을 갖고 있어서 Spring의 도움을 받아 마치 상속하는것 처럼 사용중이다.
이글의 목적은 @AuthenticationPrincipal(@CurrentUser)을 제거하고 우리가 원하는 DTO를 받는것이 핵심이다.
2. 개선하기
우선 떠오르는 방식은 2가지 정도였다.
1) 컨트롤러에서 @AuthenticationPrincipal 선언하여 엔티티의 어댑터 객체 받아오기
2) ArgumentResolver를 custom으로 만들어 인자를 전달받을 때 DTO만 받도록 한다.
여기서 2번 방식으로 선택하게 되었다.
1번 방식은 어차피 DTO를 통해 CustomUser의 모든 필드에 접근 가능해져 버린다는 점은 동일하다 생각했기 때문이다.
나는 id, email필드만 갖는 DTO를 전달받고 싶다.
2 - 1) 디버깅해보기
우선 어떤 ArgumentResolver에서 Handler에 전달할 인스턴스들을 생성하는지 찾아봐야 했다.
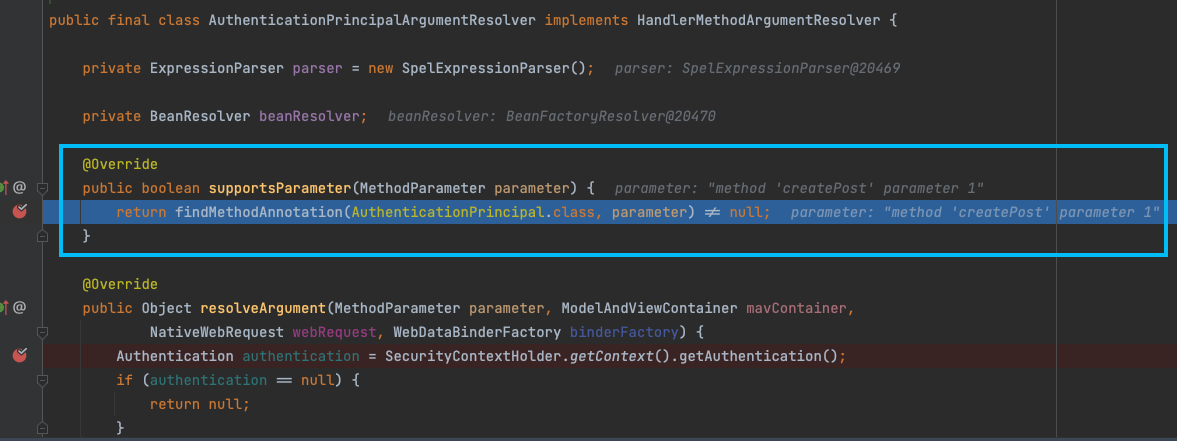
디버거를 통해 찾게 되었는데, AuthenticationPrincipalArgumentResolver가 담당하고 있었다.

우선 AuthenticationPrincipalArgumentResolver의 supportsParameter를 통해서 해당 애노테이션이 @AuthenticationPrinciapl인 것을 확인한다.
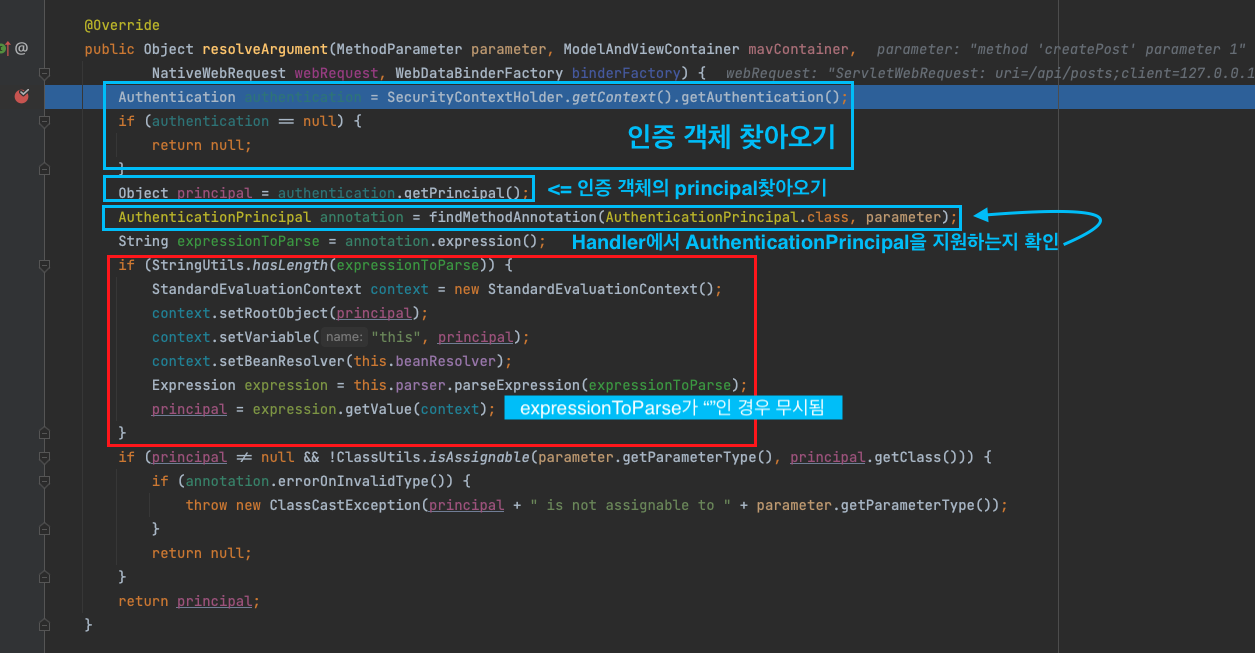
이후 resolveArgument를 통해 파라미터로 전달할 인자를 생성하게 된다. 다음 사진을 보자

1) 인증객체 찾기
2) principal을 찾아온 후
3) Handler에서 필요로 하는 애노테이션 대상인지 확인한 후
4) 해당 principal을 반환한다.
중간에 빨간 박스는 expressionToParse가 ""(빈 문자열)인 경우 무시되니 넘어가자, 이번 글의 핵심이 아니다.
이 정보를 기반으로 우리의 CustomAnotation과 CustomArgumentResolver를 만들어 보자!
2 - 2) 구현하기
2 - 2 - 1 : CurrentUser
@AuthenticationPrinciapl과 같은 역할을 해줄 커스텀 애노테이션을 하나 만들었다.
@Target(ElementType.PARAMETER)
@Retention(RetentionPolicy.RUNTIME)
public @interface CurrentUser {

    /**
     * 엄밀한 Type검증을 하고 싶다면 값을 true로 설정할 것
     * @return Boolean
     */
    boolean errorOnInvalidType() default false;
}
파라미터로 사용하기 때문에 PARAMETER가 목표이며, 또한 Retention을 runtime까지 줘서 실행시점까지 해당 애너테이션을 바이트코드에 남기도록 하겠다.
또한 errorOnInvalidType은 타입 검증 용도의 flag이다.
만약 true값을 넘기면, ArgumentResolver에서 principal이 반환할 타입(CurrentUserDto)으로 변환이 가능한지 필수적으로 확인한다.
하지만 우리의 CurrentUserDto는 CustomUser를 상속받지는 않았기 때문에 true를 넘기게 되면 ClassCastException이 발생하게 된다.
향후 혹시나 CurrentUserDto를 CustomUser를 상속받도록 하거나, 캐스팅 검증을 할 일이 있다면 사용하기 위해 구현해 두었다.
(당장은 필요가 없는 부분)
2 - 2 - 2) CurrentUserDtoArgumentResolver 구현
이제 ArgumentResolver를 다음과 같이 구현시켜 주자.
public class CurrentUserDtoArgumentResolver implements HandlerMethodArgumentResolver {

    @Override
    public boolean supportsParameter(MethodParameter parameter) {
        return findMethodAnnotation(CurrentUser.class, parameter) != null;
    }

    @Override
    public Object resolveArgument(MethodParameter parameter, ModelAndViewContainer mavContainer, NativeWebRequest webRequest, WebDataBinderFactory binderFactory) throws Exception {
        Authentication authentication = SecurityContextHolder.getContext().getAuthentication(); // LoginAuthenticationToken 타입 authentication
        if (authentication == null) {
            return null;
        }

        Object principal = authentication.getPrincipal(); // principal은 CustomUser타입
        CurrentUser annotation = findMethodAnnotation(CurrentUser.class, parameter);

        if (annotation.errorOnInvalidType()) { // Type검증 용도, 삭제 해도 무방
            if (!ClassUtils.isAssignable(parameter.getParameterType(), principal.getClass())) {
                throw new ClassCastException("Can not convert to " + parameter.getParameterType());
            }
        }

        CustomUser customUser = (CustomUser) principal; // CustomUser타입으로 변환

        return new CurrentUserDto(customUser.getId(), customUser.getEmail()); // CustomUserDto 타입으로 반환
    }

    private <T extends Annotation> T findMethodAnnotation(Class<T> annotationClass, MethodParameter parameter) {
        T annotation = parameter.getParameterAnnotation(annotationClass);
        if (annotation != null) {
            return annotation;
        }
        Annotation[] annotationsToSearch = parameter.getParameterAnnotations();
        for (Annotation toSearch : annotationsToSearch) {
            annotation = AnnotationUtils.findAnnotation(toSearch.annotationType(), annotationClass);
            if (annotation != null) {
                return annotation;
            }
        }
        return null;
    }
}
2 - 2 - 3) WebConfig에 등록시키기
WebConfig설정 파일을 만들어서 우리의 CurrnetUserDtoArgumentResolver를 등록시키자!
@Configuration
public class WebConfig implements WebMvcConfigurer {

    @Override
    public void addArgumentResolvers(List<HandlerMethodArgumentResolver> resolvers) {
        resolvers.add(new CurrentUserDtoArgumentResolver());
    }
}
이후 Controller에서 파라미터를 수정해주면 성공적으로 DTO를 전달받게 된다!
@PostMapping
public ResponseEntity<BaseResponse<Void>> createPost(
        @Valid @RequestBody PostCreateRequest request,
        @CurrentUser CurrentUserDto currentUserDto // 변경된 파라미터
) {
    postFacadeGateway.create(currentUserDto.id(), request);
    return ResponseEntity.ok(new BaseResponse<>(ResponseCodeAndMessages.FEED_CREATE_SUCCESS, null));
}
3. RestDocs문제 발생
위와 같이 추가구현을 해주고 나니, 문서화에서 문제가 발생하였다.

우리의 NullPoint 형님이 등장하셨다.
이는 인증객체인 Authentication이 SecurityContextHolder에 등록돼있지 않기 때문이다.
따라서 일단 생각난 @WithMockUser를 추가해 주자.
@WithMockUser는 Spring Security에서 공식적으로 제공하는 어노테이션으로, Spring MVC를 테스트할 때 사용됩니다.
이를 사용하면 SecurityContextHolder에 UsernamePasswordAuthenticationToken이 담기게 됩니다.
@DisplayName("문서화 : 사용자 회원 탈퇴")
@WithMockUser // 추가
@Test
public void user_delete() throws Exception {

    doNothing().when(userDetailsService).delete(any());

    mockMvc.perform(delete("/api/auth")
                    .header("Authorization", "bearer login-jwt-token")
                    .accept(MediaTypes.APPLICATION_JSON)
            )
            .andExpect(status().isOk())
            .andDo(
                    document("user-delete-auth",
                            userDeleteResponseBody())
            );
}
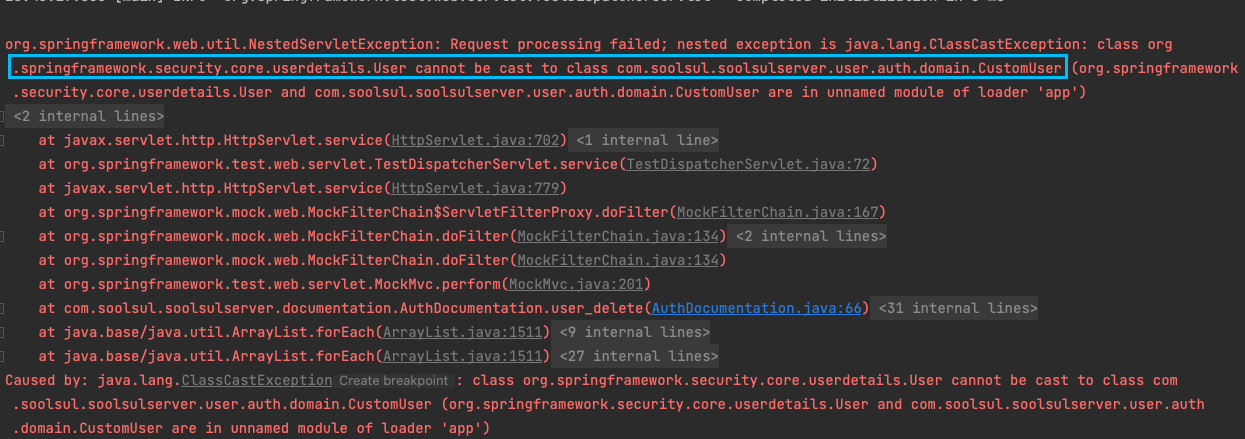
위처럼 추가해주고 나니까 다른 문제가 발생하였다.

형변환을 할 수 없다는 문제다... 그렇다... @WithMockUser는 User타입을 SecurityContextHolder에 등록시켜 준다.
내가 필요한 CustomUser로 형변환이 불가능한 것이다.
2가지 방법이 있다.
1) CustomUser를 등록하는 WithCustomMockUser를 직접 구현한다.
2) CurrnetUserDtoArgumentResolver에서 User타입의 경우 별도의 처리하는 로직을 추가 구현한다.
나는 1번 방법으로 구현을 진행하게 되었다.
이는 다음글에서 알아가 보자!
https://blogshine.tistory.com/627
[Spring] Spring Security에서 @WithMockUser를 커스텀하기
이번 글을 직전 글에서 발생한 문제를 해결하기 위해 @WithMockUser를 커스텀하여 사용하는 글을 작성해볼려 한다. 직전글을 꼭 읽을 필요는 없다. @WithMockUser를 커스텀하여 사용하는 방법은 이번 글
blogshine.tistory.com
참고
@AuthenticationPrincipal 커스텀해서 사용하기
이전에 프로젝트 진행 중 @AuthenticationPrincipal을 사용 중 @AuthenticationPrincipal을 커스텀해서 사용해야하는 문제가 있었고 어떻게 해결했는지를 공유합니다.@AuthenticationPrincipal로 Principal 객체 사용
velog.io
[Spring Security] @AuthenticationPrincipal과 ArgumentResolver
스프링 시큐리티를 구현하며 가장 어려웠던 점은 커스텀한 객체를 사용하여 메소드도 그에 맞게 변환하는 과정이었다. 기존 컨트롤러에서 인증된 객체를 가져오는 메소드로 다음과 같은 방식
sillutt.tistory.com
'BackEnd > Spring' 카테고리의 다른 글
| [Spring] @Async와 ThreadPoolTaskExecutor (0) | 2023.03.26 |
|---|---|
| [Spring] Spring Security에서 @WithMockUser를 커스텀하기 (0) | 2023.01.02 |
| [Spring] Feign Client 적용기 (0) | 2022.12.20 |
| [Spring] @Configuration 이란? (0) | 2022.09.12 |
| [Spring] @Profile과 @ActiveProfiles 를 통한 활성 프로파일(Profile)의 관리 (0) | 2022.08.23 |

댓글