내가 공부한것을 올리며, 중요한 단원은 저 자신도 곱씹어 볼겸 상세히 기록하고 얕은부분들은 가겹게 포스팅 하겠습니다.

1. 예제 만들기
이번 시간에는 예제 준비코드를 작성해보자.
▶ ExamRepository
@Repository
public class ExamRepository {

    private static int seq = 0;

    /**
     * 5번에 한번 실패하는 요청
     */
    public String save(String itemId) {
        seq++;
        if (seq % 5 == 0) {
            throw new IllegalStateException("예외 발생");
        }
        return "ok";
    }
}
▶ ExamService
@Service
@RequiredArgsConstructor
public class ExamService {

    private final ExamRepository examRepository;

    public void request(String itemId) {
        examRepository.save(itemId);
    }
}
▶ ExamTest
@Slf4j
@SpringBootTest
public class ExamTest {

    @Autowired
    ExamService examService;

    @Test
    public void test() {
        for (int i = 0; i < 5; i++) {
            examService.request("data" + i);
        }
    }
}
2. 로그 출력 AOP
먼저 로그 출력용 AOP를 만들어보자.
@Trace 가 메서드에 붙어 있으면 호출 정보가 출력되는 편리한 기능이다.
▶ Trace
@Target(ElementType.METHOD)
@Retention(RetentionPolicy.RUNTIME)
public @interface Trace {}
▶ TraceAspect
@Slf4j
@Aspect
public class TraceAspect {

    @Before("@annotation(hello.aop.exam.annotation.Trace)")
    public void doTrace(JoinPoint joinPoint) {
        Object[] args = joinPoint.getArgs();
        log.info("[trace] {} args={}", joinPoint.getSignature(), args);
    }
}
@annotation(hello.aop.exam.annotation.Trace) 포인트컷을 사용해서 @Trace 가 붙은 메서드에 어드바이스를 적용할 것 이다.
부가기능으로 파라미터로 넘어온 인자들을 출력해줄 것 이다.
이후 ExamService#request 와 ExamRepository#save 에 @Trace 를 붙였다.
테스트 코드를 통해서 확인해보자.
@Slf4j
@Import(TraceAspect.class)
@SpringBootTest
public class ExamTest {

    @Autowired
    ExamService examService;

    @Test
    public void test() {
        for (int i = 0; i < 5; i++) {
            log.info("client request i={}", i);
            examService.request("data" + i);
        }
    }
}
일단 @Import를 통해서 빈을 등록시켰다.
실행 결과는 다음과 같다.
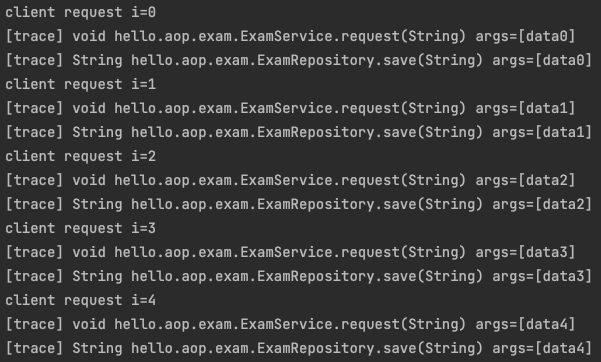
실행시 @Trace 가 붙은 request() , save() 호출시 로그가 잘 남는 것을 확인할 수 있다.
3. 재시도 AOP
이번에는 재시도 AOP를 만들것 이다.
이전의 우리 코드는 5번에 한번은 예외를 던지도록 만들었었다. 따라서 예외가 발생하면 retry하여 요청을 완수해야 한다.
@Retry 애노테이션이 있으면 예외가 발생했을 때 다시 시도해서 문제를 복구하도록 구현해보자.
▶ Retry
@Target(ElementType.METHOD)
@Retention(RetentionPolicy.RUNTIME)
public @interface Retry {
    int value() default 3;
}
▶ RetryAspect
@Slf4j
@Aspect
public class RetryAspect {

    @Around("@annotation(retry)")
    public Object doRetry(ProceedingJoinPoint joinPoint, Retry retry) throws Throwable {
        log.info("[retry] {} retry={}", joinPoint.getSignature(), retry);

        int maxRetry = retry.value();
        Exception exceptionHolder = null;
        for (int retryCount = 1; retryCount <= maxRetry; retryCount++) {
            try {
                log.info("[retry] try count={}/{}", retryCount, maxRetry);
                return joinPoint.proceed();
            } catch (Exception e) {
                exceptionHolder = e;
            }
        }
        throw exceptionHolder;
    }
}
요청 실패시 재시도를 하는 Aspect 이다.
코드를 보면 @annotation(retry) , Retry retry 를 사용해서 어드바이스에 애노테이션을 파라미터로 전달한다.
해당 retry 안에 value에 몇번 재시도 할지 담겨져있다.
예외가 발생해서 결과가 정상 반환되지 않으면 retry.value() 만큼 재시도하는 것 이다.
다음과 같이 @Retry 를 적용시켜보자.
@Repository
public class ExamRepository {

    @Trace
    @Retry(value = 4)
    public String save(String itemId) {
        //...
    }
}
ExamRepository.save() 메서드에 @Retry(value = 4) 를 적용했다. 이 메서드에서 문제가 발생하면 4번 재시도 한다.
@Import({TraceAspect.class, RetryAspect.class}) 를 스프링 빈으로 추가하자.
위에서 봤던 테스트코드를 실행하면 이번에는 정상적으로 수행하고 끝나게 된다.
출력한 로그는 다음과 같다.

마지막 5번째 시도에서 첫번째 try에서 예외가 발생하여 2번째 try를 한다.
이때 성공하여 끝나게 된다. 재시도 덕분에 문제가 복구되고, 정상 응답되는 것을 확인할 수 있다.
'BackEnd > Spring' 카테고리의 다른 글
| [Spring] @Configuration 이란? (0) | 2022.09.12 |
|---|---|
| [Spring] @Profile과 @ActiveProfiles 를 통한 활성 프로파일(Profile)의 관리 (0) | 2022.08.23 |
| [Spring] 스프링 AOP - 포인트컷 - 2 (0) | 2022.08.20 |
| [Spring] 스프링 AOP - 포인트컷 - 1 (0) | 2022.08.19 |
| [Spring] 스프링 AOP 구현 (0) | 2022.08.18 |
댓글