내돈내고 내가 공부한것을 올리며, 중요한 단원은 저 자신도 곱씹어 볼겸 상세히 기록하고 얕은부분들은 가겹게 포스팅 하겠습니다.

1) 섹션13
이번시간에는 템플릿에 대하여 배웠다.

13-1 함수 템플릿
템플릿은 여러가지 비슷한 코드에 대하여 반복하여 작업하는 것 을 방지해 준다.
우선 가장 간단한 함수 템플릿에 대하여 알아보자.
두개의 숫자를 비교하여 더 큰 숫자를 return하는 함수를 생각해 보자. 우선 다음 코드를 확인해 보자.
int getMax(int x, int y)
{
	return (x > y) ? x : y;
}

double getMax(double x, double y)
{
	return (x > y) ? x : y;
}

float getMax(float x, float y)
{
	return (x > y) ? x : y;
}
거의 형태가 비슷하며, 많은 부분이 중복되고 있다. 이걸 어떻게 자동으로 생성하는 방법이 없을까?
이때 템플릿이 등장한다!!
프로그래머가 하나하나 작업할 단순노동을 compiler에게 넘기는 것 이다. 템플릿의 사용법을 알아보자.

위의 코드와 같이 template<typename parameter> 로 작성해주면 된다. typename대신 class라 적어도 가능하다 하셨다. 문법상의 차이가 크기보다는, 뉘앙스의 차이라 하셨다.
또 parameter는 보편적으로 대문자 T를 많이 사용한다 알려주셨다.
이후 반복된 코드 부분에서 자료형 부분을 전부 T로 바꿔주면 된다.
그럼 정상적으로 작동하는지 다음코드를 보며 확인해 보자.
#include <iostream>

using namespace std;

template<typename T> // typename자리에 class를 쓸수도 있다.

T getMax(T x, T y)
{
	return (x > y) ? x : y;
}

int main()
{
	cout << getMax(1, 2) << endl;
	cout << getMax(3.14, 1.592) << endl;
	cout << getMax(1.0f, 3.4f) << endl;
	cout << getMax('a', 'c') << endl;

	return 0;
}
출력으로는 다음과 같다.
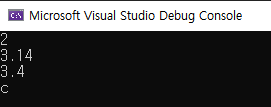
의도한 대로 작동하고있음을 알 수 있다. 문자의 경우 ASCII 로 비교를 하니 c가 나오는 것 이다.
그럼 어떻게 작동하는 것 일까?
T 자리에 무엇이 들어갈지 compiler가 찾아내고, 반복되는 코드를 compiler가 내부적으로 다 만드는 것 이다. 그리고 실행을 할때 함수 overloading 처럼 바꿔치기 하여 사용하는 것 이다.
위와 같은 built_in 데이터타입 말고, class와 같은 user define 자료형도 사용할수가 있다.
이를 알아보기 위해 예전에 사용한 Cents.h를 통하여 알아보자.
Cents.h
#include <iostream>

class Cents {
private:
	int m_cents;
public:
	Cents(int cents) : m_cents(cents) {}

};
main.cpp에서 Cents.h를 include 한 후 사용하려 하니, 연산자 오버로딩의 오류가 발생하였다.
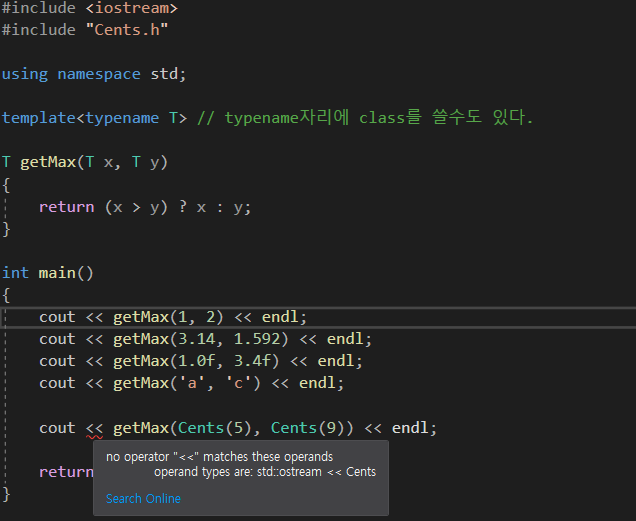
위의 코드와 같이 << 밑에 빨간줄이 뜨면서 오버로딩이 안됬다는 경고를 알려준다.
템플릿은 사용하기는 쉬운대 이처럼 사용하려면 필요한 기능들이 다 구현되있어야 한다.
다음과 같이 오버로딩을 해 주었다.
class Cents {
private:
	int m_cents;
public:
	Cents(int cents) : m_cents(cents) {}
    // << 오버로딩
	friend std::ostream& operator << (std::ostream& out, const Cents& cents)
	{
		out << cents.m_cents << " cents ";
		return out;
	}

};
컴파일 하려드니 또 오류가 발생한다!! 이번에는 어디가 문제란 말인가??

Cents class에서 부등호(>) 연산자가 오버로딩이 안되있는 것 이다.
위에서 삼항연산자를 사용했기에 > 오버로딩이 필요하다.
class Cents {
private:
	int m_cents;
public:
	Cents(int cents) : m_cents(cents) {}

	friend bool operator > (const Cents& c1, const Cents& c2){
		return (c1.m_cents > c2.m_cents);
	}

	friend std::ostream& operator << (std::ostream& out, const Cents& cents){
		out << cents.m_cents << " cents ";
		return out;
	}

};
다시 부등호(>)에 대한 오버로딩도 추가해 주었다. 결과로는 다음과 같다.
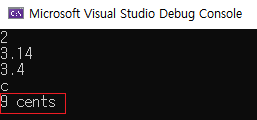
9 cents가 잘 나온것을 확인할 수 있다.
템플릿으로 만든 함수나 class를 일반적인 T 말고 특정한 데이터타입에 대하여 실제로 만드는 것을 instantiation 이라 부른다.
따라서 위의 main함수 안에서 getMax(1, 2)는 template type funtion의 int에 대한 instance가 된다.
이전까지는 메모리에 객체가 데이터를 받고 존제하는 경우를 instance라 배웠다.
큰 의미에서는 같지만, 구체적으로 보면 template의 instance는 의미가 조금 다르다.
function template instance : It turns out that C++ does not compile the template function directly. Instead, at compile time, when the compiler encounters a call to a template function, it replicates the template function and replaces the template type parameters with actual types. The function with actual types is called a function template instance. (출처: LearnCPP.com )
13-2 클래스 템플릿
이번에는 class의 template를 만들어 보자.
MyArray.h
#pragma once
#include <assert.h>
#include <iostream>

class MyArray {
private:
	int m_length;
	int* m_data;
public:
	MyArray() {
		m_length = 0;
		m_data = nullptr;
	}

	MyArray(int length) {
		m_data = new int[length];
		m_length = length;
	}

	~MyArray() {
		reset();
	}

	void reset() {
		delete[] m_data;
		m_data = nullptr;
		m_length = 0;
	}

	int& operator[](int index)
	{
		assert(index >= 0 && index < m_length);
		return m_data[index];
	}

	int getLength() {
		return m_length;
	}

	void print() {
		for (int i = 0; i < m_length; i++)
			std::cout << m_data[i] << " ";
		std::cout << std::endl;
	}
};
main.cpp
#include <iostream>
#include "MyArray.h"

using namespace std;

int main()
{
	MyArray my_array(10);

	for (int i = 0; i < my_array.getLength(); i++)
		my_array[i] = i * 10;

	my_array.print();

	return 0;
}
위의 코드를 실행시키면 0 10 20 30 ~ 80 90 까지 의도한 대로 나온다.
여기서 우리가 해볼건 만약 class MyArray의 멤버변수에 double, float, char등을 추가하려면 어떻게 해야할까?
다음과 같이 말이다.
class MyArray {
private:
	int m_length;
	int* m_data;
... 여기에 double, float등 추가
};
이전에 배운 함수 템플릿을 응용하여 class template T를 만들면 될 것이다.
바뀐 MyArray.h
template<typename T>

class MyArray {
private:
	int m_length;
	T* m_data; // 바뀐부분
public:
	MyArray() {
		m_length = 0;
		m_data = nullptr;
	}

	MyArray(int length) {
		m_data = new T[length]; // 데이터를 담는
		m_length = length;
	}

	~MyArray() {
		reset();
	}

	void reset() {
		delete[] m_data;
		m_data = nullptr;
		m_length = 0;
	}

	T& operator[](int index)
	{
		assert(index >= 0 && index < m_length);
		return m_data[index];
	}

	int getLength() {
		return m_length;
	}

	void print() {
		for (int i = 0; i < m_length; i++)
			std::cout << m_data[i] << " ";
		std::cout << std::endl;
	}
};
하지만 또다시 오류가 발생한다. 오류는 다음과 같다.
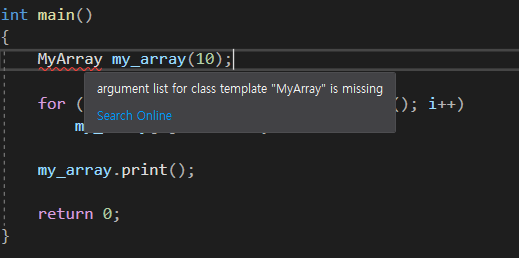
template의 parameter(매게변수)에 전달할 argument(인자)가 없다는 의미이다.
class의 인스턴스를 만들려할때 만들고 싶은 데이터타입을 정해주어야 한다.
따라서 데이터타입을 다음과 같이 명시해야 한다.
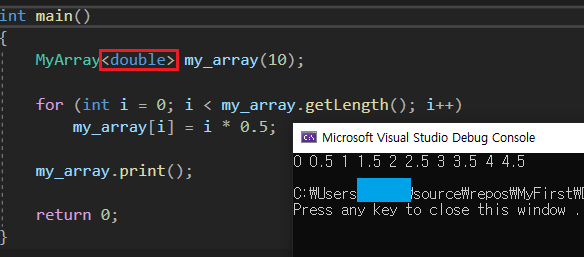
double로 인자를 넘겨주니 정상적으로 작동함을 알 수 있었다.
이번에는 조금더 복잡한 내용을 다루어보자. 우선 MyArray.h안의 print()함수 이름 위에 마우스 오른쪽 클릭하여 Quick Action~ 을 누른 후, move definition location을 누러주니 다음과 같이 변하였다.
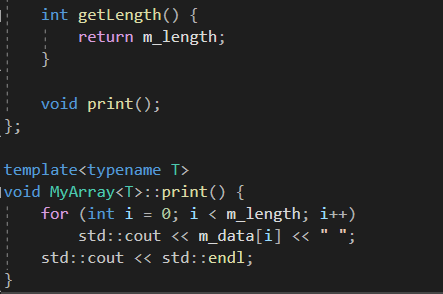
main이 아닌, 헤더파일 안에서 class밖으로 이동한 것 을 알수있다.
만약 template화 된 class가 아니였다면, 아래와 같았을 것 이다.
void MyArray::print() {
	for (int i = 0; i < m_length; i++)
		std::cout << m_data[i] << " ";
	std::cout << std::endl;
}
하지만 template이기 때문에 템플릿 parameter(MyArray<T>의 T) 가 존제한다.
그럼 class내부에 하나의 함수 정의가 빠졌으니 깔끔해졌다.
더 나아가 이 print함수의 body를 MyArray.cpp를 만들어 이동시키면 어떻게될까?
MyArray.cpp
#include "MyArray.h"

template<typename T>
void MyArray<T>::print() {
	for (int i = 0; i < m_length; i++)
		std::cout << m_data[i] << " ";
	std::cout << std::endl;
}
MyArray.cpp를 만든후 print()를 옮겨주었다. 하지만 실행시켜보니 linking error가 발생하였다.
이 에러는 무엇이 문제인지부터 알아내기 어려웠다....
왜 이러한 에러가 발생하는 것 일까?? 하나하나 살펴보자.
교수님 말씀 :
우선 main.cpp에는 #include "MyArray.h"가 선언되 있으니 MyArray.h의 내용물들이 모두 main.cpp에 복사되어 붙혀지는 것 "처럼" 작동한다. 이후 main함수 안의 MyArray<char>에서는 "MyArray라는 class를 char이라는 data_type에 대해서 instantiation 해야 되는구나" 까지는 compiler가 알 수 있다. 하지만 문제는 print()라는 멤버함수의 body를 compile 할때는 MyArray.cpp에서 compile을 한다. 그러니까 main.cpp에서는 #include "MyArray.h"만 하기 때문에 MyArray.cpp에 들어있는 내용은 모른다. 따라서 MyArray.cpp에 있는 함수를 instantiation 할 때 char로 해야한다는 것 을 모르는 것 이다.
어떻게 해결해야 할까?
우선 간단한 방법으로는 MyArray.cpp를 main.cpp안에서 include 해 준다. 하지만 이방법은 추천하지 않는다.
깔끔한 방법은 MyArray.cpp를 compile할 때 char타입으로 compile 해야 한다라고 알려주는 것 이다.
이를 explicit instantiation이라 부른다.
MyArray.cpp
#include "MyArray.h"

template<typename T>
void MyArray<T>::print() {
	for (int i = 0; i < m_length; i++)
		std::cout << m_data[i] << " ";
	std::cout << std::endl;
}

template void MyArray<char>::print(); // explicit instantiation
위의 코드를 보면 맨 아래 explicit instantiation을 위해 추가해준것이 보인다.
이렇게 하면 print하는 멤버함수를 char type에 대하여 instantiation할거니까 build를 이렇게 하라고 알려주는 것 이다. 하지만 지금은 print함수 하나라 할만하지, 만약 다른 함수들도 cpp파일로 옮겨준다면 하나하나 선언하기 힘들 것이다. 이럴때 class 자체를 explicit instantiation 하는 것 이다. 다음 코드를 보자.
#include "MyArray.h"

template<typename T>
void MyArray<T>::print() {
	for (int i = 0; i < m_length; i++)
		std::cout << m_data[i] << " ";
	std::cout << std::endl;
}

template class MyArray<char>; // class자체를
정상적으로 작동 한다.
13-3 자료형이 아닌 템플릿 매개변수
이번시간에는 템플릿에 자료형이 아닌 parameter를 전달하는 방법을 배웠다.
main.cpp
#include <iostream>
#include "MyArray.h"

using namespace std;

int main()
{
	MyArray<double, 100> my_array;

	for (int i = 0; i < my_array.getLength(); i++)
		my_array[i] = i + 65;

	my_array.print();

	return 0;
}
위의 코드를 보면 MyArray에 인자로 100을 전달하고 있다.
MyArray.h
#pragma once
#include <assert.h>
#include <iostream>

template<typename T, unsigned int T_SIZE>

class MyArray {
private:
	//int m_length; // m_lengt는 T_SIZE로 대체됨
	T* m_data; // 데이터를 가리키는
public:
	MyArray() {
		m_data = new T[T_SIZE]; // m_lengt는 T_SIZE로 대체됨
	}

	~MyArray() {
		delete[] m_data;
	}

	T& operator[](int index)
	{
		assert(index >= 0 && index < T_SIZE);
		return m_data[index];
	}

	int getLength() {
		return T_SIZE; // m_lengt는 T_SIZE로 대체됨
	}

	void print() {
		for (int i = 0; i < T_SIZE; i++) // m_lengt는 T_SIZE로 대체됨
			std::cout << m_data[i] << " ";
		std::cout << std::endl;
	}
};
위의 코드를 보면 unsigned int로 T_SIZE라는 매게변수가 선언되 있다. 이값은 m_lenght를 대신한다.
이렇게 하면 T_SIZE가 compile_time때 결정이 되있어야한다.
따라서 main.cpp에서 MyArray<double, i> 처럼 사용할려하면 오류가 난다.
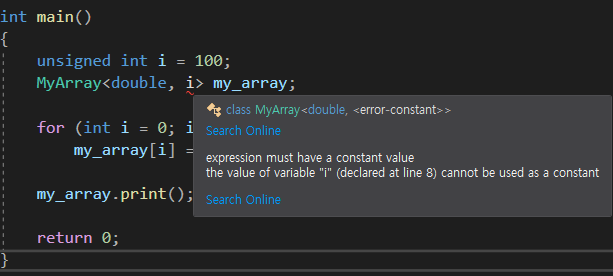
위의 코드를 보면 i부분에서 빨간줄로 경고해주고있다. 따라서 i는 compile time때 결정되있어야 한다.
MyArray<double, 100>으로 상수를 전달한후 실행하면 100개의 결과가 정상적으로 출력된다.
참고로 i를 const unsigned int i = 100;으로 선언해주면 되긴 되는대, 그냥 이렇게 사용하지는 말자
13-4 함수 템플릿 특수화(Specialization)
템플릿을 사용하다보면 특정한 자료형에 대해서는 다른 기능을 구현하고싶을때가 있다.
이럴때 사용하는 것이 템플릿 특수화 이다.
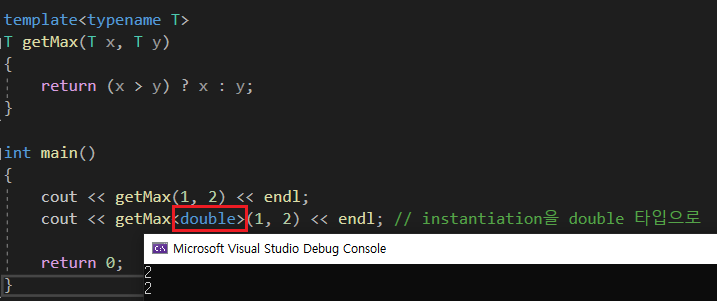
위의 코드에서는 <double>을 명시하여 인자가 1,2로 정수임에도 불구하고 double로 instantiation을 진행해주고 있다.
그런데 만약 character를 instantiation 할때는 문자끼리 비교한다는 것 을 사용자에게 경고를 띄워주고싶을수도 있다. 이때 특수화를 사용한다.
특수화는 일반화 되있던것 중 특수한 type에 대해서만 적는형태라 typename T가 필요없다. 다음 코드를 확인해보자.
#include <iostream>

using namespace std;

template<typename T>
T getMax(T x, T y)
{
	return (x > y) ? x : y;
}

template<>  // 특수화
char getMax(char x, char y)
{
	cout << "Warning : comparing chars" << endl;

	return (x > y) ? x : y;
}

int main()
{
	cout << getMax('a', 'b') << endl;

	return 0;
}
결과는 다음과 같다.
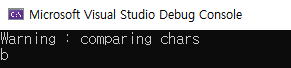
이는 "템플릿화 된 함수인 getMax(T x, T y)가 있는데, 만약 인자로 char type을 전달한다면 getMax(char x, char y)를 사용해라" 라는 뜻 이다.
다음으로는 일반적인 경우를 본후, member function을 특수화 하는 경우를 살펴보자.
main.cpp
#include <iostream>
#include "Storage.h"

using namespace std;

int main()
{
	Storage<int> nValue(5);
	Storage<double> dValue(6.7);

	nValue.print();
	dValue.print();

	return 0;
}
Stroage.h
#pragma once
#include <iostream>
template <class T>
class Storage {
private:
T m_value;
public:
Storage(T value) {
m_value = value;
}
~Storage() {}
void print() {
std::cout << m_value << '\n';
}
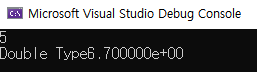
};결과로는 5 와 6.7이 정상적으로 출력된다. 여기서 만약 double타입을 출력할때는 그냥 출력하는 것 이 아니라, scientific으로 출력하고 싶다면 어떻게 해야할까? (특수화가 필요)

위의 코드처럼 특수화를 하면된다. 이렇게하면 Storage class가 double에 대해서 instantiation된 경우 print함수는 위의 특수화된 구조로 실행된다. 결과는 다음과 같다.
이전에 배웠던대로 위의 Storage class의 member함수인 print()를 Storage.cpp로 옮겨서 실행하면 특수화가 적용되지 않는다. 해결방법으로는
1) 전부 헤더안에 집어넣는다. 대부분 이렇게 해결
2) cpp를 main에서 include하는 방법(비추, 되기는 됨), 오픈소스를 보다보면 있다고는 하셨음.
다만 main에서 cpp자체를 include하는 것은 피해보라고 알려주셨다.
왜 이런방식으로 작용하는 것 일까?
이유에 관해서는 교수님의 강의가 아니라, 따로 추가적으로 공부하고있는 명품 C++ 10장 템플릿 단원에서 확인할 수 있었다.
"템플릿 함수와 이름이 동일한 함수가 중복되어 있을 때, 컴파일러는 중복된 함수를 템플릿 함수보다 우선하여 바인딩 한다." - 명품 C++ -
13-5 클레스 템플릿 특수화
우선 다음코드를 살펴보자.
#include <iostream>
#include <array>
using namespace std;
template<typename T>
class A {
public:
void doSomething() {
cout << typeid(T).name() << endl;
}
void test() {}
};
int main()
{
A<int> a_int;
A<double> a_double;
A<char> a_char;
a_int.doSomething();
a_double.doSomething();
a_char.doSomething();
return 0;
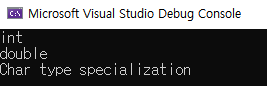
}평범한 코드라 결과는 생각한대로 int double char이 출력될 것 이다. 이제 여기서 char type에 대해서만 특별한 행동을 하도록 특수화를 시켜보자. 다음 코드를 main.cpp 에 추가해주면 된다.
template<>
class A<char> {
public:
	void doSomething() {
		cout << "Char type specialization" << endl;
	}
};
이후 다시한번 실행해보면 결과는 다음과 같다.

사진 설명을 입력하세요.
사실상 다른 class를 새로 구현하는것과 비슷하다.
사실상 "다른" 이라고 말한 이유는 test함수를 통하여 확인할 수 있다.
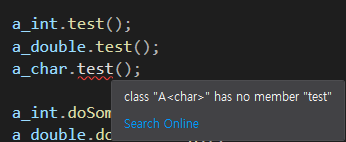
a_char에서는 class A의 멤버함수인 test가 존제하지 않는다. 이를통해 템플릿은 상속이 아니라는점 명심하자.
만약 생성자를 잘 만들어 주면 main에서 A<int> a_int; 에서 <int>를 생략할 수 있다. 다음 코드를 확인해 보자.
바뀐 main.cpp (참고로 이 문법은 C++17 이상에서만 가능)
#include <iostream>
#include <array>

using namespace std;

template<typename T>
class A {
public:
	A(const T& input) {}

	void doSomething() {
		cout << typeid(T).name() << endl;
	}

	void test() {}
};

template<>
class A<char> {
public:
	A(const char & temp) {}

	void doSomething() {
		cout << "Char type specialization" << endl;
	}
};

int main()
{
	A a_int(1);
	A a_double(3.14);
	A a_char('a');

	a_int.doSomething();
	a_double.doSomething();
	a_char.doSomething();

	return 0;
}
위의 코드를 보면 main에서 a_int(1)에 들어간 인자가 정수임을 알기때문에 <int>를 생략할 수 있다.
결과는 다음과 같다.
다음으로는 조금더 실용적이 예제를 풀어보자.
다음 예제의 class에서는 어떤 type의 data를 8개 저장할수가 있다. 특수화는 bool에 대하여 해놨다.
bool은 사실 true와 false라 1비트만으로도 표현이 가능하지만, 메모리 주소의 체계가 1바이트 단위라 1비트만 사용할수가 없다. 따라서 1바이트를 할당받는다.
우리의 실험은 만약 8개의 bool타입을 동시에 처리한다면, 1바이트 만 갖고도 처리가 가능 하도록 하는 것 이다.
main.cpp
#include <iostream>
#include <array>
#include "Storage.h"

using namespace std;

int main()
{
	Storage8<int> intStorage;

	for (int count = 0; count < 8; count++)
		intStorage.set(count, count);

	for (int count = 0; count < 8; count++)
		std::cout << intStorage.get(count) << '\n';

	cout << "Sizeof Storage8<int> " << sizeof(Storage8<int>);

	// Define a Storage8 for bool
	Storage8<bool> boolStorage;
	for (int count = 0; count < 8; ++count)
		boolStorage.set(count, count & 3);

	for (int count = 0; count < 8; ++count)
		std::cout << (boolStorage.get(count) ? "true" : "false") << '\n';

	cout << "Sizeof Storage8<bool> " << sizeof(Storage8<bool>) << endl;

	return 0;
}
Storage.h
#pragma once

#include <iostream>

template <class T>
class Storage8 {
private:
	T m_array[8];
public:
	void set(int index, const T& value) {
		m_array[index] = value;
	}

	const T& get(int index)
	{
		return m_array[index];
	}
};

template<>
class Storage8<bool> { // 1바이트 단위로 할당
private:
	unsigned char m_data;
public:
	Storage8() : m_data(0) {}

	void set(int index, bool value) {
		unsigned char mask = 1 << index;

		if (value)
			m_data |= mask;
		else
			m_data &= ~mask;
	}

	bool get(int index) {
		unsigned char mask = 1 << index;
		return (m_data & mask) != 0;
	}
};
실행결과
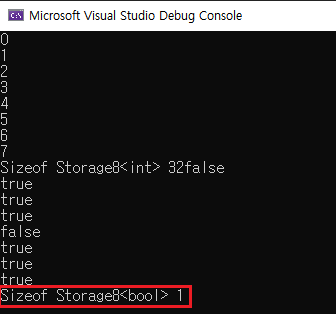
빨간 박스 안을보면 bool타입 8개를 저장하는데 1바이트만 사용하고있음을 확인할 수 있다.
특수화를 적용하지 않으면 8바이트가 나온다. 1바이트는 8비트이니까 8개의 bool정보를 저장할수가있다.
13-6 템플릿을 부분적으로 특수화 하기 (Partial Specialization)
이번에는 템플릿을 부분적으로만 특수화 하는 방법을 배워보자.
#include <iostream>
#include <array>

using namespace std;

template <class T, int size>
class StaticArray {
private:
	T m_array[size];
public:
	T* getArray() { return m_array; }

	T& operator[](int index) {
		return m_array[index];
	}
};

template <typename T, int size>
void print(StaticArray<T, size>& array)
{
	for (int count = 0; count < size; ++count)
		std::cout << array[count] << ' ';
	std::cout << endl;
}

int main()
{
	StaticArray<int, 4> int4;
	int4[0] = 1;
	int4[1] = 2;
	int4[2] = 3;
	int4[3] = 4;

	print(int4);

	StaticArray<char, 14> char14;
	char14[0] = 'H';
	char14[1] = 'e';
	// ...
	strcpy_s(char14.getArray(), 14, "Hello, world");

	print(char14);
	cout << endl;
	return 0;
}
결과로는 다음과 같다.
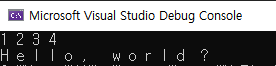
결과를 보면 숫자는 한칸씩 빈칸을 두고 출력하는 것 이 좋은데, 문자의 경우 빈칸이 있는것은 읽기에 불편하다.
이는 print함수 안의 빈칸출력이 문제인 것 이다. 따라서 char을 출력할때는 특수화를 적용해줘야 한다.
T만 char에 대하여 특수화 시켜보자.
template <int size>
void print(StaticArray<char, size>& array)
{
	for (int count = 0; count < size; ++count)
		std::cout << array[count];
	std::cout << endl;
}
위와 같이 적용해 주면 문자들을 붙어서 잘 나온다.
다음으로는 print함수를 아예 StaticArray class안으로 이동시켜 멤버함수로 만들어 보자.
바뀐 main.cpp
template <class T, int size>
class StaticArray {
private:
	T m_array[size];
public:
	T* getArray() { return m_array; }

	T& operator[](int index) {
		return m_array[index];
	}

	void print()
	{
		for (int count = 0; count < size; ++count)
			std::cout << (*this)[count] << ' ';
		std::cout << endl;
	}
};

int main()
{
	StaticArray<int, 4> int4;
	int4[0] = 1;
	int4[1] = 2;
	int4[2] = 3;
	int4[3] = 4;

	int4.print();

	StaticArray<char, 14> char14;
	char14[0] = 'H';
	char14[1] = 'e';
	// ...
	strcpy_s(char14.getArray(), 14, "Hello, world");

	char14.print();
	cout << endl;
	return 0;
}
위와 같이 변경해 주면 작동은 잘 하는데, char에 대한 특수화가 적용되지 않아서 글자가 다시 띄어져서 나온다.
따라서 멤버함수를 특수화 시켜줘야 하는데, 이건 조금 이전보다 힘들어 진다. 이때 좀 편하게 하는 방법이 있다.
바로 class의 상속을 받는 것 이다.
상속을 받는 이유는 템플릿을 통체로 특수화 하는거 보다는 이방식이 편해서 사용한다.
#include <iostream>
#include <array>

using namespace std;

template <class T, int size>
class StaticArray_BASE {
private:
	T m_array[size];
public:
	T* getArray() { return m_array; }

	T& operator[](int index) {
		return m_array[index];
	}

	void print()
	{
		for (int count = 0; count < size; ++count)
			std::cout << (*this)[count] << ' ';
		std::cout << endl;
	}
};

template <class T, int size>
class StaticArray : public StaticArray_BASE<T, size> {}; // 상속

template <int size>
class StaticArray<char, size> : public StaticArray_BASE<char, size> { // 특수화 적용
public:
	void print() // overriding
	{
		for (int count = 0; count < size; ++count)
			std::cout << (*this)[count];
		std::cout << endl;
	}
};

int main()
{
	StaticArray<int, 4> int4;
	int4[0] = 1;
	int4[1] = 2;
	int4[2] = 3;
	int4[3] = 4;

	int4.print();

	StaticArray<char, 14> char14;
	char14[0] = 'H';
	char14[1] = 'e';
	// ...
	strcpy_s(char14.getArray(), 14, "Hello, world");

	char14.print();
	cout << endl;
	return 0;
}
원래 있던 class의 이름을 StaticArray_BASE 로 변경하였고, 특수화 하고 싶은 template의 instance를 필요한 부분만 다시 특수화 시켯다. 상속을 받았고 override 해줬기 때문에 getArray나 연산자를 다시 구현할 필요가 없다.
13-7 포인터에 대한 템플릿 특수화
#include <iostream>
#include <array>

using namespace std;

template<class T>
class A {
private:
	T m_value;
public:
	A(const T& input) : m_value(input) {}

	void print() {
		cout << m_value << endl;
	}
};

int main()
{
	A<int> a_int(123);
	a_int.print();

	int temp = 456;

	A<int*> a_int_ptr(&temp);
	a_int_ptr.print();

	double temp_d = 3.141592;
	A<double*> a_double_ptr(&temp_d);
	a_double_ptr.print();

	return 0;
}
a_int는 정수가 잘 들어가고 있고, 나머지는 int와 double의 포인터를 넘겨주고 있다. 결과는 다음과 같다.
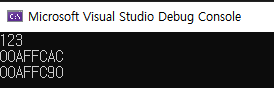
당연히 주소가 나오고 있다. 만약 포인터에 대해서만 특별하게 작동하고 싶다면 어떻게 해야할까?
template<class T>
class A<T*> { // T가 포인터일때만 특수화 적용
private:
	T* m_value;
public:
	A(T* input) : m_value(input) {}

	void print() {
		cout << *m_value << endl;
	}
};
위의 코드를 추가해 주면 특수화를 적용시킬 수 있다.
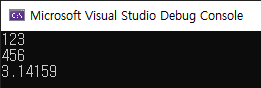
이번에는 주소가 아닌 값이 역참조되어 나오는것을 확인할 수 있다.
13-8 멤버 함수를 한 번 더 템플릿화 하기
어떤 class가 이미 템플릿화 되어있는 경우에도 멤버함수에 추가적인 템플릿을 적용하는 방법이 있다.
#include <iostream>
#include <array>
using namespace std;
template<class T>
class A {
private:
T m_value;
public:
A(const T& input) : m_value(input) {}
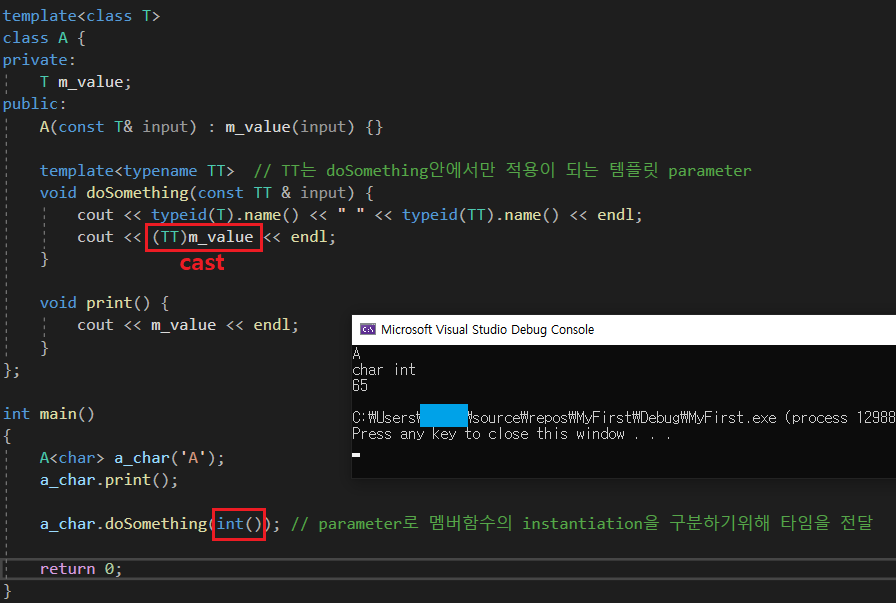
template<typename TT> // TT는 doSomething안에서만 적용이 되는 템플릿 parameter
void doSomething() {
cout << typeid(T).name() << " " << typeid(TT).name() << endl;
}
void print() {
cout << m_value << endl;
}
};
int main()
{
A<int> a_int(123);
a_int.print();
a_int.doSomething<float>();
return 0;
}위의 코드에서 TT부분을 잘 살펴보자. TT는 doSomething안에서만 적용이 되는 템플릿 parameter로 작용한다.
결과로는 다음과같다.
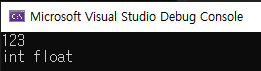
만약 doSomething함수에 매게변수를 만들어 주면
void doSomething(const TT & input) {
    cout << typeid(T).name() << " " << typeid(TT).name() << endl;
}
main에서 다음과 같이 인자만으로 타입을 알아낼 수 있다.
int main()
{
	A<int> a_int(123);
	a_int.print();

	a_int.doSomething(123.4);

	return 0;
}
doSomething함수 뒤에 <float>가 사라졌지만 정상작동 한다. int와 double로 정상적으로 나온다.
어떤 경우에는 casting에도 사용할수 가 있다.
2) 나의 현황
- 약간 오락가락 하는것 같다. 다시한번 복습해야 겠다.
- 2021/02/10 3회 복습완료
이글의 모든 사진과 내용의 출처는 홍정모 교수님께 있습니다.
홍정모 교수님 블로그:
홍정모 연구소 : 네이버 블로그
안녕하세요! 홍정모 블로그에 오신 것을 환영합니다. 주로 프로그래밍 관련 메모 용도로 사용합니다. 강의 수강하시는 분들은 홍정모 연구소 카페로 오세요.
blog.naver.com
'CS > C++' 카테고리의 다른 글
| C++ 공부 섹션15 스마트포인터 : 홍정모의 따배씨쁠쁠 (0) | 2022.01.17 |
|---|---|
| C++ 공부 섹션14 예외처리 : 홍정모의 따배씨쁠쁠 (0) | 2022.01.17 |
| C++ 공부 섹션12 다형성 : 홍정모의 따배씨쁠쁠 (0) | 2022.01.16 |
| [C++] 오버로딩(Overloading) 과 오버라이딩(Overriding) 차이 (0) | 2022.01.16 |
| C++ 공부 섹션11 상속 : 홍정모의 따배씨쁠쁠 (0) | 2022.01.16 |
댓글